Make Your Own Custom Child Theme for Divi
Easy peasy, I promise!While there are many reasons out there on the internet of why you should use a child theme, the number one reason why people ask me about it is to change the footer on Divi from the default text. That is why I have created a simple blank Divi child theme for you, to change the footer without adding any additional styles or functionality to your Divi site.
Can you do more with it though? Sure. I often use a child theme with Divi to add functions for my clients or to apply custom styles to the site in a way that isn’t easily broken. I can also add additional templates or template parts to the child theme to increase its functionality. Putting these items inside a child theme also protects them from bring written over every time the Divi theme is updated, which can be often as they are continually making improvements and changes to the theme.
To see how to apply a child theme to your site, watch the video below. Or, if you’re not into video, follow the instructions after the download link. Before you get started though, you’ll want to make sure that you have your WordPress site open and logged in, and your Divi and child themes downloaded on your hard drive. (The child theme download link is further down this page, but you’ll have to get Divi directly from Elegant Themes.) And now, on with the video!
Get Your Free Divi Child Theme Here
This is a blank Divi child theme to help get you started Download NowHate videos? Rather read? Yeah me too. Here is what you do:
1. Download the child theme using the link above.
It will put a zip file on your hard drive. Don’t open it or unzip it – you’ll need it for later in zip format.
2. Install the child theme.
For this part, I’m assuming you already have WordPress and Divi installed on your website. Go into your themes, choose “Add New”, then “Upload Theme” and upload this zip file. Then click “Activate” on the child theme.
3. Edit the footer text.
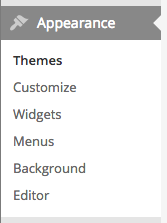
Choose “Editor” from the “Appearance” menu in your left sidebar. Click on “Theme Footer” on the right. You’ll find this about line 40:
<p id=”footer-info”>©<?php echo date(“Y”); ?> YOUR FOOTER TEXT GOES HERE</p>
What this means is this: “Start paragraph, make a copyright symbol, print the year, and then have some footer text.” If the “©2016” part is okay with you, leave it there and just change the “YOUR FOOTER TEXT GOES HERE” part. Or you can erase everything between <p id=”footer-info”> and </p> and put your own information in. Just make sure you leave the paragraph tag parts!
Click “Update File” at the bottom to save your new footer.
4. Enjoy!
I’ve also included a functions.php file in case you need to add any custom functions, and a style.css file with room for any styles you want. (For those who like to tinker.)
Want to share? Please do!
You can share this instructional post and/or the zip file with anyone you would like.
You can also use this child theme over and over again for yourself or your clients.
It’s yours to keep, free of charge!
All I ask is that …
- You leave the original credits at the top, and
- You don’t expect any free and/or personalized support from me via phone or e-mail for the theme.
(I am available for hire if you need help with your site, however.)