This is a common question I’m asked – how do I make my site faster? While there are a variety of techniques that I use to help speed up a site, decreasing the image load is often the one thing that helps the most. But what does that mean, exactly? So … here is how you decrease your image load:
Step 1: Use the right type of image.
Did you know that using the wrong image format can make your images 20-60% larger than they need to be? If you use a GIF instead of a JPG for a full-color photo or a JPG instead of PNG for a text-based flow chart, your images are probably using way more bandwidth than they should.
If you’re not sure what format to use, Google’s documentation on the subject (which is very useful but gets pretty technical) gives us this handy flowchart:
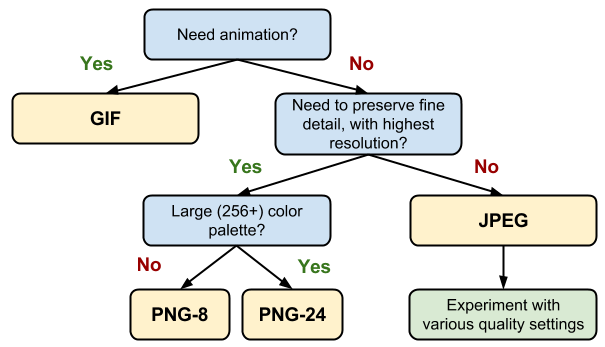
The bottom line is this: Use JPG for photos, GIF for animations, PNG for text-based graphics or where you need transparency … and keep experimenting to find the right balance between quality and file size.
Bonus tip: While you’re at it, name your images something appropriate to help with organization and SEO. For example, "nikole_gipps_head_shot.jpg” is a much better name than “DCP_0293.JPG”, and “screenshot_of_marketing_tools.png” is better than “CAPTURE103.PNG”.
Step 2: Use the right size of images.
If you are putting an image into a space that is 400×300 pixels, and you are uploading an image that is 4000×4000 pixels, that is overkill. Yes, it’s true that WordPress will resize your images for you, but why bother uploading a 10MB picture that you will be using a 200K version of? Resize that to something reasonable and let WordPress break it into small, medium and large sizes for you. You’ll not only save server space, but you’ll also be reducing the chance of you embedding a huge image on a page that you didn’t intend. Try using a program like picmonkey or Canva, or ask your photographer or graphic designer to provide the files in a smaller size for you.
Step 3: Use the right images for the theme.
When you use a theme like Divi, you have the option of having nice full-size images on the header or page. The downside of this is that you may be trying to use images that are too large, take too long to download, or contain extra information that the theme can’t even use. For example, if the max width of the photo in a section is 1080, and you are uploading a photo that is 4000px wide, you’re just wasting your viewers’ bandwidth by serving up the larger image. (And, the Divi editor is displaying the full image, not the resized ones.) If you are using Divi, use this guide to help you out with image sizes and ratios. If you are using another theme, look up the theme’s documentation for guidance.
Step 4: Compress your images.
If you are using a program like picmonkey, you will be given options when you export the photo to save at a smaller size. Don’t pick the largest and picmonkey will compress your image for you. (I generally pick the middle option because it’s a good mix between quality and size.)
Once you have your images the right size, you can further compress them as you upload them to your WordPress site by using a plugin like one of these:
- Smush Image Compression and Optimization “Smush has been benchmarked and tested number one for speed and quality and is the award-winning, proven crowd favorite image optimization plugin for WordPress. Now with image resizing! Set a max width and height and large images will scale down as they are being compressed.” This is the one I use the most on client sites, especially for the bulk compression features when you first install it and want to compress all your older images. It is fast and reliable but can’t handle larger images at times.
- Compress JPEG & PNG images “Make your website faster by optimizing your JPEG and PNG images. This plugin automatically optimizes all your images by integrating with the popular image compression services TinyJPG and TinyPNG.” I like how this one compresses, but I feel like it takes a long time and there are pretty heavy limits on how many images you can do per month – which makes initial setup when you have a bunch of older images difficult.
- EWWW Image Optimizer
“The EWWW Image Optimizer will increase your page speeds by way of image optimization. It will also save you storage space and bandwidth. While EWWW I.O. will automatically optimize new images that you upload, it can also optimize all the images that you have already uploaded, and optionally convert your images to the best file format. You can choose pixel perfect compression or high compression options that are visually lossless.” I’m not a fan of how this one stores the images, but I have several clients who like it.
Need more help?
I offer a speed optimization bonus with my Security Audit service for those who want to have their site optimized for them, where I optimize the entire site and its code along with the images. Have questions? Comment below or contact me!